Best practices to recruit the best candidate
Read More...
[Source: The Code Project Latest Articles - Posted by FreeAutoBlogger]
->Read More...
Recruiting the right candidate
Implementing CheckBoxes in GridView
Phần miêu tả
This article provides details on how to include CheckBoxes in GridView control so that a user can select/deselect particular row(s) from the GridView. This would enable the user to perform actions like deleting/changing status etc. of the selected rows in one go.
Phần mở rộng
Introduction
This article provides details on how to include CheckBoxes in GridView control so that a user can select/deselect particular row(s) from the GridView. This would enable the user to perform actions like deleting/changing status etc. of the selected rows in one go.
Background
There are a few web sites that describe how to include checkboxes in GridView, and quite a few describe how to perform (multiple) selection of the rows from the gridview so that the rows (based on a primary value) can be identified and any further processing performed. This article tries to consolidate the whole process of including and using checkboxes in GridView control to delete selected rows from the database. As a bonus, the code also provides details on displaying images in GridView.
->Read More...Planet 3D (Alias GL Earth)
Planet 3D (Alias GL Earth)
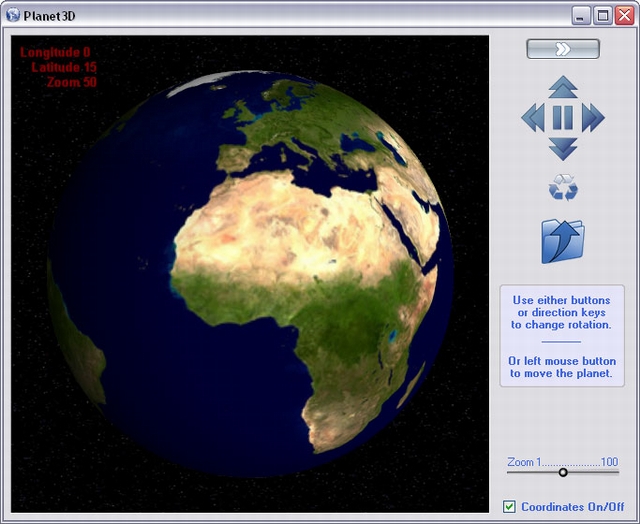
Introduction
The project exclusively uses the features found in VISUAL C# 2005 Express Edition.
Planet 3D is a companion to my Panorama contribution, that has already been posted there.
The demo is provided with several textures to create the stellar background and each of the planets.
Note: In order to keep the size of the ZIP file small, the provided textures are in low resolution mode (I have larger resolution that I can send on demand).
The control uses 3D polar coordinates, and either keyboard direction key or buttons to change the planet rotation angle.
You can also use the left mouse button while in the OpenGL control to rotate the planet.
Several classes and "user controls" help the creation of the skinned button and the dedicated trackbar.
Smooth zooming is used to enlarge or reduce the size of the planet while the stellar background is left unchanged.
Code Insight
SkinEngine.cs
This class is responsible for the drawing of skinned form and custom controls.
SkinButton.cs
User control to create skinned button using one single 5-image bitmap matching each of the button states: normal, down, disabled, focused, hover.
You can use either "standard" push button or shaped button with region.
SkinTrackbar.cs
User control to create a mouse only skinned track bar.
The thumb tracker can have any size or shape based on a provided bitmap.
The control orientation is based on the ratio between width and height; if width is larger than height then horizontal else vertical.
To help the user to figure the moving of the thumb track, the control draws a layered triangle over the background and uses a tooltip to show the current value.
You can inverse ranging swapping min/max values.
OpenGL.cs
Encapsulation of the OpenGL API being used.
Win32.cs
Encapsulation of the Win32 API being used.
GDImage.cs
Encapsulation of the GDImage API being used.GDImage is a prerequisite to create OpenGL font and convert image to GL texture on the fly.
Comment
I hope you will like Planet 3D and perhaps learn a few things from it.
You will find more contributions on my Web site in the "C# corner" section.
History
- 13th November, 2006: Initial post
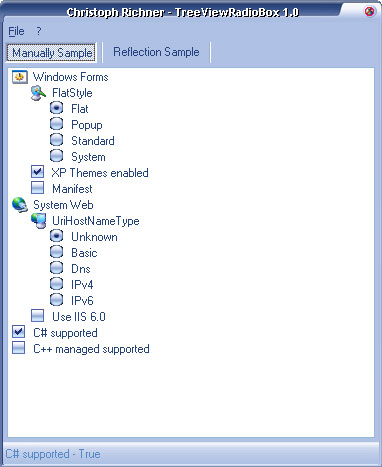
XP theme aware TreeView control which supports checkbox and radio button nodes.
Introduction
This tree view control is able to visualize checkbox and radio buttons, like the one you can find under Internet Explorer settings advanced tab. After Spy++ told me that Microsoft uses a normal tree view control, I fired up my Studio to write my own C# control clone namedTreeViewRadioBox.
TreeViewRadioBoxReflection works a bit like the PropertyGrid. The public read and writeable properties of type bool and enum are fetched (reflection) and displayed as checkboxes and radio buttons, grouped by their category attribute. The properties' values are automatically updated if you edit the value in the tree view.
CoppyRight :http://www.codeproject.com/KB/tree/TreeViewRadioBox.aspx
->Read More...DropDownContainer - Custom DropDown Container Using the ToolStripDropDown (VB.NET)
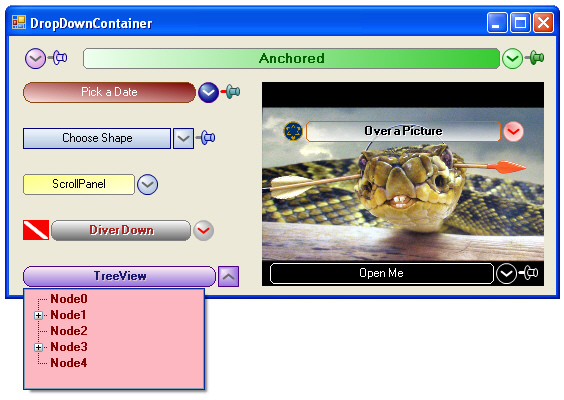
Introduction
You may think you have seen this one before, and you will be partially correct. I wanted a ComboBox like dropdown control that I could drop other controls onto and arrange them at design time. Because the ToolStripDropDown couldn't be handled directly at design time and I didn't fully understand it yet, I made the DropDownPanel[^] which is a User Control that Inherits Panel and has a fancy size change routine. It is a good control, and works well for certain situations, but it still wasn't a true dropdown like I wanted. Then, I got the idea you will find here. I decided to create a separate article for this control because I felt there are enough different techniques in each to not just update and replace the DropDownPanel article.
The ToolStripDropDown had two main stumbling points. First, you cannot see it on the design surface, and second, it contains only one control at a time. You can put a bunch of controls on a Panel and then put that "one" Panel control in the ToolStripDropDown, but then, you have these extra controls laying around your design surface, cluttering it up, or you have to hide them somewhere. Then, I got the idea to hide it in a DropDownContainer, and show it like I did in the DropDownPanel control at Design Time, and in theToolStripDropDown at Run Time, depending on the DesignMode property.
Copyright :http://www.codeproject.com/KB/static/DropDownContainer.aspx
->Read More...FolderTreeView Control
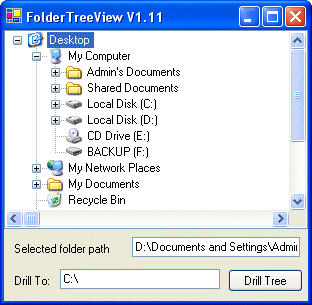
Introduction
This is an all-new version of the FolderTreeView control I posted here at CodeProject some weeks ago. The control now starts in the Desktop namespace, and a new drilling method has been added so the startup folder can be specified. Please note that this control is not intended to have all of the functionality of the actual Windows Explorer TreeView - it is a light-weight control designed for use in projects where you want to supply a treeview for folder navigation, without supporting windows shell extensions. If you are looking for a control that supports shell extensions you should be looking at the excellent ËxplorerTreeControl submitted by Carlos H Perez here at the CodeProject website.
How it works
After calling the InitFolderTreeView() method, a dummy Desktop not is created as the root node, and then the shell's Desktop namespace is iterated to populate the first level nodes. The child nodes are then iterated, checking only for the presence of sub-child nodes. If sub-child nodes are found, a dummy node is inserted so that the [+] will be displayed for folders that can be expanded. When the BeforeExpand event fires, the folder being expanded is checked for a dummy node. If a dummy is present, it is removed and the node's children are re-populated. If the node's children have already been populated no further action occurs.
Usage
The FolderTreeView control is based on 3 classes:
-
FolderTreeView- The FolderTreeView implementation -
ShellOperations- Supporting Shell Operations -
ExtractIcons- Shell Icon Extractor
System.Windows.Forms.TreeView, exposing 1 new property, GetSelectedNodePath() which returns the currently selected node's full path. There are 2 new methods: InitFolderTreeView() must be called to populate the TreeView - normally you would call this in your Form's OnLoad event. The 2nd method is DrillToFolder(string folderPath) - this will recurse through the tree looking for the specified folder path, returning a boolean to indicate if the search was sucessful or not. The method used to retreive the icon for the Desktop root node works fine, but is perhaps not the best way to go about it. This control has NOT been tested in Win9x, NT or 2000 - feedback on these OS's would be much appreciated. Of course if you improve this control I would appreciate the update, and if you have any feedback to offer, please post it below.
Updates
Version 1.11:
- Updated the
GetDesktopIcon()method so it returns the shell's small desktop icon rather than the large version - Added code so that the Desktop node would return the full desktop folder path
License
This article has no explicit license attached to it but may contain usage terms in the article text or the download files themselves. If in doubt please contact the author via the discussion board below.
A list of licenses authors might use can be found here
Visual Studio 2005 ToolBox Clone

Introduction
This control is a very simple VisualStudio ToolBox control clone. The control itself is just a owner drawn TreeView. Because it is based on a standard treeview it supports only one style of the Visual Studio Toolbox - the list style.
Background
Many weeks ago i needed a simple control that looks like the ToolBox in VisualStudio 2005. There're some control on codeproject doing stuff like this. But all this controls are too oversized for me. So i wrote my own one...
To create the look and feel of the toolbox i have just overridden the OnDrawNode method. Depending on the node level the OnDrawNode method will call the method for root items or sub items. As you can see, there're only two levels possible in this control. An item on level 0 will be a root item and drawn as the darker header items. All subitem (level > 0) will be drawn on level 1 as sub item.
Adding advanced tool tips to the toolbox was a little tricky, because the standard treeview does not support such tool tips. First i had to disable the standard tool tip functionality of the treeview like this way:
private const int TVS_NOTOOLTIPS = 0x80;

/// <summary>
/// Disables the tooltip activity for the treenodes.
/// </summary>
protected override CreateParams CreateParams
{
 get
 {
   CreateParams p = base.CreateParams;
   p.Style = p.Style | TVS_NOTOOLTIPS;
   return p;
 }
}
After that, i have implemented a tool tip control which supports the advanced look and feel of the modern too tips (also used in the original Visual Studio ToolBox).
Using the code
The handling of this control is quite easy. If you ever have worked with the .Net TreeView control you should not have any problems with it. But you have to set some properties at this time to let the control look like the Visual Studio ToolBox:
* Set the DrawMode to OwnerDrawAll
* Set the FullRowSelect to true
* Set the HideSelection to false
* Set the HotTracking to true
* Set the ItemHeight to 20
* Add an ImageList
Adding new Groups:
// To support the custom tool tips we
// have to add an enhanced node type to the toolbox.
ToolBox.VSTreeNode newGroup = new ToolBox.VSTreeNode();

newGroup.Text = String.Format("Sample Node {0}", toolBox1.Nodes.Count + 1);

toolBox1.Nodes.Add(newGroup);
Adding new items to a group:
ToolBox.VSTreeNode newSubItem = new ToolBox.VSTreeNode();

newSubItem.Text =  String.Format("Sample SubItem {0}",
       toolBox1.SelectedNode.Nodes.Count + 1);

// Assuming, that a image list is set.
newSubItem.ImageIndex     = 0;
newSubItem.ToolTipCaption = "Look atg this!";
newSubItem.ToolTipText    = "This is an example ToolTip.";

// It's also possible to add a context menu to a node (root or subitem)
newSubItem.ContextMenuStrip = cmsExample;

// Add the new subitem to the toolbox.

toolBox1.SelectedNode.Nodes.Add(newSubItem);
->Read More...
Subscribe to:
Bài đăng (Atom)


