Best practices to recruit the best candidate
Read More...
[Source: The Code Project Latest Articles - Posted by FreeAutoBlogger]
->Read More...
Recruiting the right candidate
Implementing CheckBoxes in GridView
Phần miêu tả
This article provides details on how to include CheckBoxes in GridView control so that a user can select/deselect particular row(s) from the GridView. This would enable the user to perform actions like deleting/changing status etc. of the selected rows in one go.
Phần mở rộng
Introduction
This article provides details on how to include CheckBoxes in GridView control so that a user can select/deselect particular row(s) from the GridView. This would enable the user to perform actions like deleting/changing status etc. of the selected rows in one go.
Background
There are a few web sites that describe how to include checkboxes in GridView, and quite a few describe how to perform (multiple) selection of the rows from the gridview so that the rows (based on a primary value) can be identified and any further processing performed. This article tries to consolidate the whole process of including and using checkboxes in GridView control to delete selected rows from the database. As a bonus, the code also provides details on displaying images in GridView.
->Read More...Planet 3D (Alias GL Earth)
Planet 3D (Alias GL Earth)
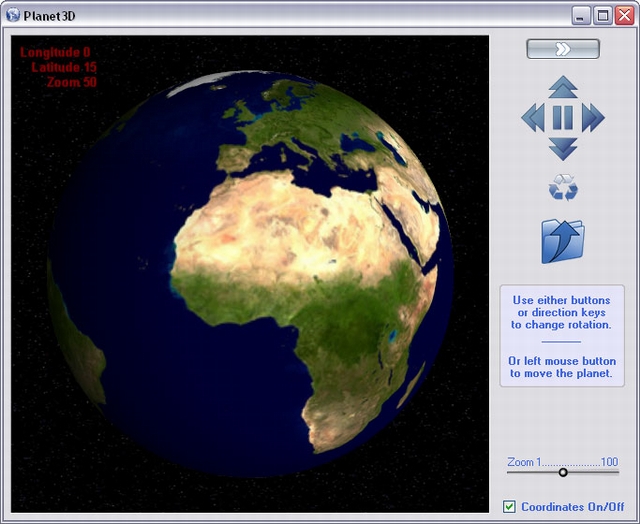
Introduction
The project exclusively uses the features found in VISUAL C# 2005 Express Edition.
Planet 3D is a companion to my Panorama contribution, that has already been posted there.
The demo is provided with several textures to create the stellar background and each of the planets.
Note: In order to keep the size of the ZIP file small, the provided textures are in low resolution mode (I have larger resolution that I can send on demand).
The control uses 3D polar coordinates, and either keyboard direction key or buttons to change the planet rotation angle.
You can also use the left mouse button while in the OpenGL control to rotate the planet.
Several classes and "user controls" help the creation of the skinned button and the dedicated trackbar.
Smooth zooming is used to enlarge or reduce the size of the planet while the stellar background is left unchanged.
Code Insight
SkinEngine.cs
This class is responsible for the drawing of skinned form and custom controls.
SkinButton.cs
User control to create skinned button using one single 5-image bitmap matching each of the button states: normal, down, disabled, focused, hover.
You can use either "standard" push button or shaped button with region.
SkinTrackbar.cs
User control to create a mouse only skinned track bar.
The thumb tracker can have any size or shape based on a provided bitmap.
The control orientation is based on the ratio between width and height; if width is larger than height then horizontal else vertical.
To help the user to figure the moving of the thumb track, the control draws a layered triangle over the background and uses a tooltip to show the current value.
You can inverse ranging swapping min/max values.
OpenGL.cs
Encapsulation of the OpenGL API being used.
Win32.cs
Encapsulation of the Win32 API being used.
GDImage.cs
Encapsulation of the GDImage API being used.GDImage is a prerequisite to create OpenGL font and convert image to GL texture on the fly.
Comment
I hope you will like Planet 3D and perhaps learn a few things from it.
You will find more contributions on my Web site in the "C# corner" section.
History
- 13th November, 2006: Initial post
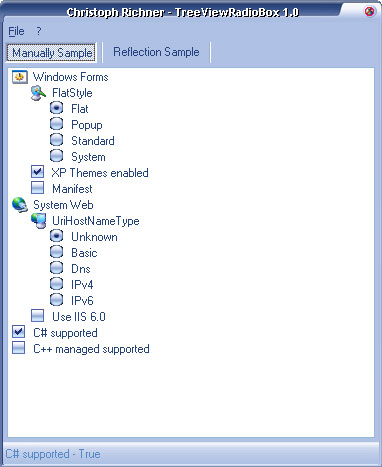
XP theme aware TreeView control which supports checkbox and radio button nodes.
Introduction
This tree view control is able to visualize checkbox and radio buttons, like the one you can find under Internet Explorer settings advanced tab. After Spy++ told me that Microsoft uses a normal tree view control, I fired up my Studio to write my own C# control clone namedTreeViewRadioBox.
TreeViewRadioBoxReflection works a bit like the PropertyGrid. The public read and writeable properties of type bool and enum are fetched (reflection) and displayed as checkboxes and radio buttons, grouped by their category attribute. The properties' values are automatically updated if you edit the value in the tree view.
CoppyRight :http://www.codeproject.com/KB/tree/TreeViewRadioBox.aspx
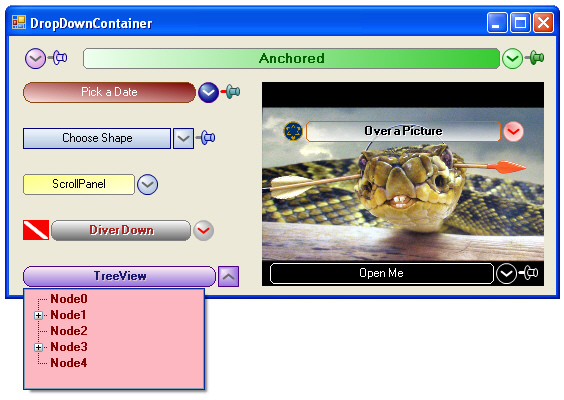
->Read More...DropDownContainer - Custom DropDown Container Using the ToolStripDropDown (VB.NET)
Introduction
You may think you have seen this one before, and you will be partially correct. I wanted a ComboBox like dropdown control that I could drop other controls onto and arrange them at design time. Because the ToolStripDropDown couldn't be handled directly at design time and I didn't fully understand it yet, I made the DropDownPanel[^] which is a User Control that Inherits Panel and has a fancy size change routine. It is a good control, and works well for certain situations, but it still wasn't a true dropdown like I wanted. Then, I got the idea you will find here. I decided to create a separate article for this control because I felt there are enough different techniques in each to not just update and replace the DropDownPanel article.
The ToolStripDropDown had two main stumbling points. First, you cannot see it on the design surface, and second, it contains only one control at a time. You can put a bunch of controls on a Panel and then put that "one" Panel control in the ToolStripDropDown, but then, you have these extra controls laying around your design surface, cluttering it up, or you have to hide them somewhere. Then, I got the idea to hide it in a DropDownContainer, and show it like I did in the DropDownPanel control at Design Time, and in theToolStripDropDown at Run Time, depending on the DesignMode property.
Copyright :http://www.codeproject.com/KB/static/DropDownContainer.aspx
->Read More...FolderTreeView Control
Introduction
This is an all-new version of the FolderTreeView control I posted here at CodeProject some weeks ago. The control now starts in the Desktop namespace, and a new drilling method has been added so the startup folder can be specified. Please note that this control is not intended to have all of the functionality of the actual Windows Explorer TreeView - it is a light-weight control designed for use in projects where you want to supply a treeview for folder navigation, without supporting windows shell extensions. If you are looking for a control that supports shell extensions you should be looking at the excellent ËxplorerTreeControl submitted by Carlos H Perez here at the CodeProject website.
How it works
After calling the InitFolderTreeView() method, a dummy Desktop not is created as the root node, and then the shell's Desktop namespace is iterated to populate the first level nodes. The child nodes are then iterated, checking only for the presence of sub-child nodes. If sub-child nodes are found, a dummy node is inserted so that the [+] will be displayed for folders that can be expanded. When the BeforeExpand event fires, the folder being expanded is checked for a dummy node. If a dummy is present, it is removed and the node's children are re-populated. If the node's children have already been populated no further action occurs.
Usage
The FolderTreeView control is based on 3 classes:
-
FolderTreeView- The FolderTreeView implementation -
ShellOperations- Supporting Shell Operations -
ExtractIcons- Shell Icon Extractor
System.Windows.Forms.TreeView, exposing 1 new property, GetSelectedNodePath() which returns the currently selected node's full path. There are 2 new methods: InitFolderTreeView() must be called to populate the TreeView - normally you would call this in your Form's OnLoad event. The 2nd method is DrillToFolder(string folderPath) - this will recurse through the tree looking for the specified folder path, returning a boolean to indicate if the search was sucessful or not. The method used to retreive the icon for the Desktop root node works fine, but is perhaps not the best way to go about it. This control has NOT been tested in Win9x, NT or 2000 - feedback on these OS's would be much appreciated. Of course if you improve this control I would appreciate the update, and if you have any feedback to offer, please post it below.
Updates
Version 1.11:
- Updated the
GetDesktopIcon()method so it returns the shell's small desktop icon rather than the large version - Added code so that the Desktop node would return the full desktop folder path
License
This article has no explicit license attached to it but may contain usage terms in the article text or the download files themselves. If in doubt please contact the author via the discussion board below.
A list of licenses authors might use can be found here
Visual Studio 2005 ToolBox Clone

Introduction
This control is a very simple VisualStudio ToolBox control clone. The control itself is just a owner drawn TreeView. Because it is based on a standard treeview it supports only one style of the Visual Studio Toolbox - the list style.
Background
Many weeks ago i needed a simple control that looks like the ToolBox in VisualStudio 2005. There're some control on codeproject doing stuff like this. But all this controls are too oversized for me. So i wrote my own one...
To create the look and feel of the toolbox i have just overridden the OnDrawNode method. Depending on the node level the OnDrawNode method will call the method for root items or sub items. As you can see, there're only two levels possible in this control. An item on level 0 will be a root item and drawn as the darker header items. All subitem (level > 0) will be drawn on level 1 as sub item.
Adding advanced tool tips to the toolbox was a little tricky, because the standard treeview does not support such tool tips. First i had to disable the standard tool tip functionality of the treeview like this way:
private const int TVS_NOTOOLTIPS = 0x80;

/// <summary>
/// Disables the tooltip activity for the treenodes.
/// </summary>
protected override CreateParams CreateParams
{
 get
 {
   CreateParams p = base.CreateParams;
   p.Style = p.Style | TVS_NOTOOLTIPS;
   return p;
 }
}
After that, i have implemented a tool tip control which supports the advanced look and feel of the modern too tips (also used in the original Visual Studio ToolBox).
Using the code
The handling of this control is quite easy. If you ever have worked with the .Net TreeView control you should not have any problems with it. But you have to set some properties at this time to let the control look like the Visual Studio ToolBox:
* Set the DrawMode to OwnerDrawAll
* Set the FullRowSelect to true
* Set the HideSelection to false
* Set the HotTracking to true
* Set the ItemHeight to 20
* Add an ImageList
Adding new Groups:
// To support the custom tool tips we
// have to add an enhanced node type to the toolbox.
ToolBox.VSTreeNode newGroup = new ToolBox.VSTreeNode();

newGroup.Text = String.Format("Sample Node {0}", toolBox1.Nodes.Count + 1);

toolBox1.Nodes.Add(newGroup);
Adding new items to a group:
ToolBox.VSTreeNode newSubItem = new ToolBox.VSTreeNode();

newSubItem.Text =  String.Format("Sample SubItem {0}",
       toolBox1.SelectedNode.Nodes.Count + 1);

// Assuming, that a image list is set.
newSubItem.ImageIndex     = 0;
newSubItem.ToolTipCaption = "Look atg this!";
newSubItem.ToolTipText    = "This is an example ToolTip.";

// It's also possible to add a context menu to a node (root or subitem)
newSubItem.ContextMenuStrip = cmsExample;

// Add the new subitem to the toolbox.

toolBox1.SelectedNode.Nodes.Add(newSubItem);
->Read More...
An ASP.NET Application to View and Share Photos Online
Introduction
This application gives you some basic photo-sharing capability similar to Ofoto or Yahoo-photos. The advantage to rolling your own application is that you gain full control over the content and layout of your site (no popup ads!) and you can completely customize it to fit your needs.
This article describes the application, which is actually 2 separate apps - a back-end Windows Forms C# application that scans your directories and files to build a database, and an ASP.NET application that presents the photos and allows the user to view them and edit them (to provide a caption and description).
Note that there is a C# Photo Album Viewer posted on CodeProject by Mark Nischalke, but that is Windows Forms only. I was looking for something enabled for use through a web browser.
Background
This article assume you have basic working knowledge of C#, Windows Forms, ASP.NET programming, and some SQL statement knowledge. You'll need to have either the full version of SQL Server, or you can get MSDE, the free version of SQL.
The application as it is currently built will scan for all *.jpg files in subdirectories of your pictures folder. Future enhancements may include recursively scanning all files in all subdirectories.
Using the code
Before reading the article you may want to get the code installed and running. To do this you should follow these steps:
- Download the Back-end Windows Forms app and unzip it somewhere on your hard drive.
- Edit the application config file to specify your SQL server and the root folder containing your pictures. This file is called App.Config, but note that VS.NET will automatically copy and rename this file to NPdbman.exe.config when you build the project.
- Run the NPdbman.exe application and select "Initialize" from the database menu. This will create the tables and constraints in a new SQL database called netpix.
- Select "Build" from the database menu. This will populate the tables with the information scanned from the folder specified in the configuration file.
- Download the Front-end ASP.NET app and unzip it in the IIS wwwroot folder. Run the IIS configuration tool, and right-click on the netpix folder. Select 'Properties' and in the 'Application Settings' pane, select 'Create'.
- Edit the web.config for the application and specify your SQL server connection.
- You should now be able to browse to http://localhost/netpix/default.aspx and browse your photos!
The database
It would have certainly been possible to build a simple application that did not use a database and simply scanned the folder and file information on the fly, but using a database will allow us to implement some advanced features which would have been awkward and difficult without the power of the RDBMS.
Schema
Here is a diagram of the database, which consists of just 2 small related tables:
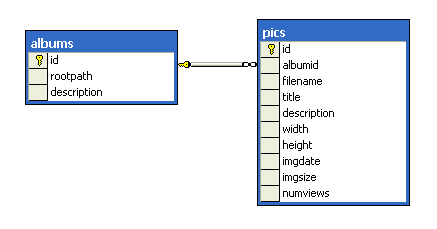
The albums table is built from subdirectories of your Pictures folder. Each subdirectory maps to one album in the table. You can provide a description for an album, so that the user will see a name for the album which may or may not be the actual folder name in the file system.
The pics table is built from the *.jpg files found in each subdirectory (album). The pics table is related to the albums table by a foreign key constraint, because every picture must belong to an album. Most of the column names should be pretty self-explanatory except perhaps numviews. This column counts the number of times a user has viewed the full picture and is incremented by the ASP.NET code, every time that a user clicks on a picture. We will see this code shortly.
Stored procedures
There are just a couple stored procedures. The first one inserts a picture into the pics table (if it does not already exist there):
CREATE PROCEDURE CreatePic(@albumid int, @filename varchar(255),
                          @width int, @height int,
                          @imgdate datetime, @imgsize int) AS

IF NOT EXISTS(SELECT [id] FROM pics WHERE albumid=@albumid
 AND [filename]=@filename)
 INSERT INTO pics (albumid, [filename], width,
           height, imgdate, imgsize)
        values (@albumid, @filename, @width,
           @height, @imgdate, @imgsize);
The second is similar, but it operates on the albums table and it returns the identity value of the new record (or the existing one):
CREATE PROCEDURE CreateAlbum(@rootpath varchar(1024),
                       @description varchar(255), @id int output) AS

SELECT @id = (SELECT [id] FROM albums WHERE rootpath=@rootpath);

IF @id IS NULL
BEGIN
 INSERT INTO albums (rootpath, [description])
               values (@rootpath, @description);
 SET @id = SCOPE_IDENTITY();
END
The back-end
The back end is a Windows Forms application that you run on the server to build the database by scanning your pictures folder. There are 2 basic functions: to reset (delete) everything in the database, and then to scan and build all the entries. This article won't discuss how you build a forms application or hook up menu entries, etc., because that is covered in depth elsewhere.
Reset/ Initialize Code
Let's take a look at the reset/initialize code. First there is a generic routine which reads a .sql script file and executes it on the given connection:
private void ExecuteBatch(SqlConnection conn, string filename)
{
   // Load the sql code to reset/build the database

   System.IO.StreamReader r = System.IO.File.OpenText(filename);
   string sqlCmd = r.ReadToEnd();
   r.Close();

   // Build & execute the command

   SqlCommand cmd = new SqlCommand(sqlCmd, conn);
   cmd.CommandType = CommandType.Text;
   cmd.ExecuteNonQuery();
}
This is pretty basic SQL interaction. This code is executed for the scripts resetdb.sql, createalbum.sql and createpics.sql. These script file contains all the necessary SQL to drop and then CREATE TABLE and ALTER TABLE statements to setup the database schema and stored procedures. Any error that occurs here will be thrown from the application and handled by the generic popup handler.
Populating the database
The database is built by compiling the scanned information from the file system into a DataSet object which is then committed to the database. First we setup the objects we will use for creating the albums table:
// The dataset

DataSet ds = new DataSet();

// The command object calls the stored proc which either does the insert or

// returns the existing row id. In either case

// the output parameter id is then

// used to update our existing DataTable object with the actual id.

insertAlbumCmd = new SqlCommand("CreateAlbum", conn);
insertAlbumCmd.CommandType = CommandType.StoredProcedure;
insertAlbumCmd.Parameters.Add("@rootpath",
         SqlDbType.VarChar, 1024, "rootpath");
insertAlbumCmd.Parameters.Add("@description",
         SqlDbType.VarChar, 256, "description");
insertAlbumCmd.Parameters.Add("@id", SqlDbType.Int, 0, "id");
insertAlbumCmd.Parameters["@id"].Direction = ParameterDirection.Output;
insertAlbumCmd.UpdatedRowSource = UpdateRowSource.OutputParameters;
We build the command which will invoke the stored procedure listed above. We tell ADO.NET that, after the insert, it should take the output parameter from the stored procedure and use this value (the identity value) to update the id column of the disconnected DataTable.
// The adapter only needs to perform an insert. (Select is for FillSchema)

albumsAdapter = new SqlDataAdapter("SELECT * FROM albums", conn);
albumsAdapter.InsertCommand = insertAlbumCmd;
albumsAdapter.FillSchema(ds, SchemaType.Mapped, "albums");
DataTable albums = ds.Tables["albums"];
Here we attach the command to a SqlDataAdapter object and then pull the schema from the database into our table.
// Need to seed negative values to prevent dups during the insert when SQL

// generated values conflict with ADO.NET generated values

DataColumn dc = albums.Columns["id"];
dc.AutoIncrementSeed = -1;
dc.AutoIncrementStep = -1;
This part is important because it avoids any duplicate keys being generated during the batch update. If the SQL server returns an identity value which already exists in the DataTable, an exception would be thrown. Using negative identity values prevents this from ever happening.
Finally we can get about doing the actual work:
string[] dirs = System.IO.Directory.GetDirectories(rootPath);

foreach (string dir in dirs)
{
   // Insert or update the album in the database

   string dirname = System.IO.Path.GetFileName(dir);

   // New row will populate the primary key for us

   DataRow dr = albums.NewRow();
   dr["rootpath"] = dir;
   dr["description"] = dirname;
   albums.Rows.Add(dr);
}

// Commit the albums to the database

albumsAdapter.Update(ds, "albums");
The Update will insert all pending rows into the data store.
Populating the pictures table follows the same logic, so I won't repeat it here. For each *.jpg file found, a row is added to the DataTable and then the SqlDataUdapter Update method is invoked in order to perform the necessary inserts. The main difference are the columns required; for each image found, this method is called to collect the necessary data into the DataRow:
protected void GetImageInfo(string imgpath, DataRow dr)
{
   // Get data about this pic and populate

   // the data row for the insert

   System.IO.FileStream fs = File.Open(imgpath,
        FileMode.Open, FileAccess.Read, FileShare.Read);
   Bitmap img = new Bitmap(fs);
   dr["filename"] = System.IO.Path.GetFileName(imgpath);
   dr["imgsize"] = (int)fs.Length;
   dr["height"] = img.Height;
   dr["width"] = img.Width;
   dr["imgdate"] = File.GetCreationTime(imgpath);
   dr["numviews"] = 0;
   img.Dispose();
   fs.Close();
}
Unfortunately this causes a major performance hit because each image must be loaded into memory in order to determine its dimensions. This is a one-time up-front operation, so this is an acceptable tradeoff.
The front-end
The front-end is the actual ASP.NET application which pulls our data out from the database and formats it nicely for the user.
The list of albums
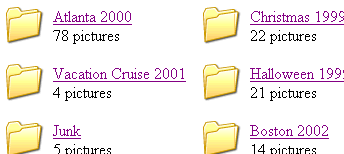
The first thing the user sees is a list of albums, along with a little folder icon and a bit of information about the album itself (the number of pictures it contains). This is implemented with a DataList control. The control is defined here:
<asp:DataList id="dl" runat="server"
         RepeatDirection="Horizontal" RepeatColumns="3">
 <ItemTemplate>
 <table><tr><td><img src="folder.png"></td>
   <td><asp:HyperLink Runat="server" ID="hlItem"
     NavigateUrl='<%# "viewalbum.aspx?id=" +
            DataBinder.Eval(Container.DataItem, "id")%>'
     Text='<%#DataBinder.Eval(Container.DataItem,
            "description")%>'>
   </asp:HyperLink><br>
   <asp:Label Runat="server" ID="lbItem"
              Text='<%# DataBinder.Eval(Container.DataItem,
                            "piccount") + " pictures" %>'>
   </asp:Label></td>
 </tr></table>
 </ItemTemplate>
</asp:DataList>
The important thing to note here is that each item is comprised of a folder bitmap, a HyperLink control, and a Label control. The Hyperlink has its text bound to the description of the album, and its URL bound to the viewalbum.aspx page. It passes the album ID to the viewalbum.aspx in the URL.
The code behind for this file is all of two lines:
    // Load the albums table and bind to the datalist

   dl.DataSource = npdata.GetAlbums();
   dl.DataBind();
The GetAlbums method is defined in a class named npdata. The npdata class contains static methods which encapsulate the data access adapters and commands to interface with the SQL database. The GetAlbums method does a basic select and fill and returns the DataSet. You may notice that the Label control references the piccount column, which does not exist in our schema. The piccount column is a calculated value which you can see in the query we use to bind to the list:
SqlDataAdpater adap = new SqlDataAdapter("SELECT *," +
               "(SELECT COUNT(*) FROM pics WHERE pics.albumid=albums.id)
               AS piccount " +
               "FROM albums", conn);
So the piccount column is calculated by doing a sub-query on the pics table to determine how many pictures have a parent in the given album.
Viewing an album
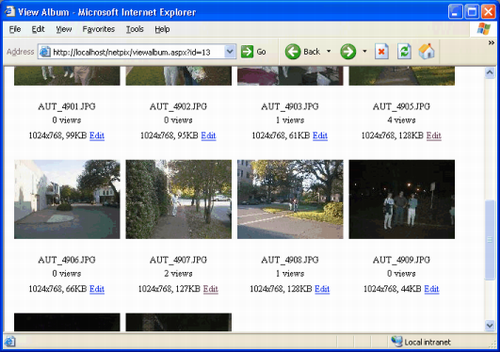
When the user clicks on an album, the NavigateUrl property from the HyperLink control directs the browser to viewalbum.aspx and the album ID is passed along in the URL. This page generates a thumbnail for each image along with a basic description, and allows the user to click the image or edit the image properties. We once again utilize the DataList control for this functionality and it operates much the same way. The one point of note in this DataList is the actual URL for the thumbnail image:
<img border="0" src='<%# "genimage.ashx?thumbnail=y&id="
              + DataBinder.Eval(Container.DataItem, "id") %>'>
We can't link directly to the .jpg file because the server is not directly sharing the images folder. So we link to a page called genimage.ashx which implements a sort of proxy that accepts the picture ID and streams the actual image data back to the client. It also accepts a thumbnail parameter, which indicates that the image should be sized down to 150x150. Note the .ashx extension; these are special files containing directives that you easily implement your own IHttpHandler-derived class. These classes give you a low-level interface to send data back to the client without all the overhead of creating and managing the lifecycle of a Page object. Our .ashx file contains only one line:
This directs the client request for handling by the ImageGenerator class which is discussed in the next section.
Generating the pictures
The ImageGenerator class implements the IHttpHandler interface, which is a very simple and low-level interface for send raw streams of data back to the client. We are just dumping the bytes of image, so it's perfect for our needs. Since this class is key to the operation of the application, we will examine all of the code for this class:
public class ImageGenerator : IHttpHandler
{
   public bool IsReusable
       { get { return true; } }

   public void ProcessRequest(HttpContext Context)
   {
       // Get the image filename and album root path from the database

       int numviews;
       int picid = Convert.ToInt32(Context.Request["id"]);
       string imgpath = npdata.GetPathToPicture(picid, out numviews);

       // Writing an image to output stream

       Context.Response.ContentType = "image/jpg";
Here we retrieve the picture ID from the URL and invoke the GetPathToPicture method which wraps a SQL join statement that returns the full local path to the image, as well as the number of times the image has been viewed on the client. Then we set the content type to jpg because we are impersonating a jpg file.
    // 'thumbnail' means we are requesting a thumbnail

   if (Context.Request["thumbnail"] != null)
   {
       // Need to load the image, resize it, and stream to the client.

       // Calculate the scale so as not to stretch or distort the image.

       Bitmap bmp = new Bitmap(imgpath);
       float scale = 150.0f / System.Math.Max(bmp.Height, bmp.Width);
       System.Drawing.Image thumb = bmp.GetThumbnailImage(
           (int)(bmp.Width * scale), (int)(bmp.Height * scale),
           null, System.IntPtr.Zero);
       thumb.Save(Context.Response.OutputStream,
           System.Drawing.Imaging.ImageFormat.Jpeg);
       bmp.Dispose();
       thumb.Dispose();
   }
In the case where the Request URL contains the thumbnail parameter, we first load the image file from disk and call GetThumbnailImage to scale it down. We scale it down by a constant factor to maintain the aspect ratio so as not to distort the image. We then save the resized image directly to the Response object's output stream. This puts a pretty heavy stress on the server CPU when a large number of thumbnails are requested (I will discuss this in the 'Future Items' section).
    else
   {
       // Stream directly from the file

       System.IO.FileStream fs = File.Open(imgpath,
           FileMode.Open, FileAccess.Read, FileShare.Read);

       // Copy it out in chunks

       const int byteLength = 16384;
       byte[] bytes = new byte;
       while( fs.Read(bytes, 0, byteLength ) != 0 )
       {
           Context.Response.BinaryWrite(bytes);
       }
       fs.Close();

       // Now increment the view counter in the database

       npdata.SetNumViews(picid, numviews+1);
   }
}
In this case, we are interested in streaming the image directly from the file contents. The current implementation reads the file contents in chunks and sends them to the response's output stream. We also need to increment the picture's view count in the database because the full-size image has been requested. The SetNumViews method just issues an SQL UPDATE statement to the pics table to set the numviews column for the given picture.
Viewing and editing a Picture

From the album view, the user can either view an image or edit the image information. There really isn't much of interest happening in viewpic.aspx or editpic.aspx. The user can supply title and description information in the editor, which will then be used by the viewer. The viewer will show the title for a picture if available, otherwise it will default to the filename. This is accomplished in the SQL statement:
    // The command to select a specific picture data

   getpicinfo = new SqlCommand("SELECT ISNULL(title, filename)
                      AS returntitle, " +
                      "ISNULL([description],'') AS returndesc "+
                      "FROM pics WHERE pics.id=@picid", conn);
   getpicinfo.Parameters.Add("@picid", SqlDbType.Int);
Our schema design dictates that we will use the DB Null value to indicate no custom title is present. When this happens, we use the image filename as the text for the picture's caption.
Future/To-Do items
This application only represents the basic framework of a robust image cataloging and viewing system. Some ideas that can be implemented:
- Cache the thumbnail images in the application's Cache dictionary. Setup a file system dependency to automatically invalidate the cache item if the image changes on disk.
- Support for multiple users could be achieved by adding a user table to the database and adding another foreign key column to the albums table to identify the user it belongs to.
- More information could be stored in the
picstable: number of colors, etc. and more formats (i.e. GIF) could be supported - Add functionality to invite users to view your pictures using a web form to specify the E-mail addresses.
- As noted, generating the thumbnails on the fly puts a heavy CPU load on the server. In a high-volume environment, it is preferable for the back-end generator to create the thumbnails and either store them in the database itself or at a known location in the file system.
- Many other ideas...
History
- Initial version: July 27, 2003
- Updated: June 29, 2003 - Implemented some suggestions from feedback.
License
This article has no explicit license attached to it but may contain usage terms in the article text or the download files themselves. If in doubt please contact the author via the discussion board below.
A list of licenses authors might use can be found here
Cloud Control for ASP.NET
Introduction
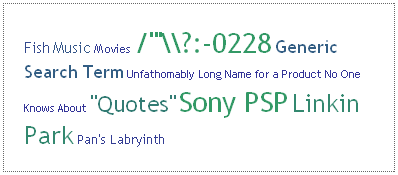
This is an ASP.NET server control that you can customize that will generate a keyword/search/tag cloud, given a DataSet. Feel free to change the code to your purposes.
Example:
Background
This is the first release version. To view a demo and to download the current release, please see the project homepage.
Features
- Free source code or component-only.
- Generated by
DataSet(use with XML, databases, or create programmatically etc.). - Optional two-color gradient cloud.
- Various font size units (em, px, pt, %).
- Max and min font sizes (in Hex format).
- Sort by a field name, ascending or descending.
- Customizable URL w/ variables.
- Customizable link title format w/ variables.
- Assignable CSS class.
- Ability to add custom HTML attributes to links (w/ variables).
- XHTML-valid and CSS-friendly.
Using the code
To use this component, you need to copy the SearchCloud.dll DLL file to your bin directory. Once it is copied, open up the page you plan to implement the Cloud in, and add this to the top:
Then, implement the cloud by using this tag:
<is:cloud id="cloud1" runat="server" /> Before using it, you need to assign it a DataSource and some field names. To do so, open the code-behind of your page and use this code to activate the control:
    Dim ds As New DataSet

   Cloud1.DataIDField = "keyword_id"
   Cloud1.DataKeywordField = "keyword_value"
   Cloud1.DataCountField = "keyword_count"
   Cloud1.DataURLField = "keyword_url"

   Cloud1.DataSource = ds
You have to have a DataSet with keyword data to be able to use the control. This can come from a database, XML file, or anything that can be translated into a DataSet.
Silver JukeBox with an Alternative Client
Contents
- Credit
- Abstract
- Introduction
- Prerequisites
- The Client
- The Server
- Web Service Interfaces
- Data Structure
- Using Amazon Associates Web Service for Getting Album Art
- Encrypted Communication
- Authentication
- Mail-Delivered Exception Logging
- History
Credit
First of all I would like to credit UncleRedz for making this article a reality. He was the one who originally created the Silver JukeBox, and was kind enough to share the code with me. Basically all code on the server is written by him, the only thing I've done is to change to a Northwind database, add the possibility to download album art and somewhat modify the interfaces in order to make them fit my client better. Kudos to UncleRedz for sharing and being the original creator of this application.
Abstract
I would like to state three facts that are true about my persona:
- I can't sing or play any sort of instrument (not even the triangle), but I love music
- Music has an influence on my mood
- If I could, I would like to have access to music wherever I am
The first and second facts are hard to affect (sure, I could take courses in learning to play the triangle, but I am of the opinion that certain things should be done by professionals), but the third one would be really cool to fix. The music I love and listen to is stored at my home computer; would it be possible to access that music indifferent of where I am? The answer is of course 'yes' and this article will demonstrate how it's done.
Introduction
The application consists of two parts:
- A server running on my home computer, built on WPF and WCF, responsible for keeping track of my music
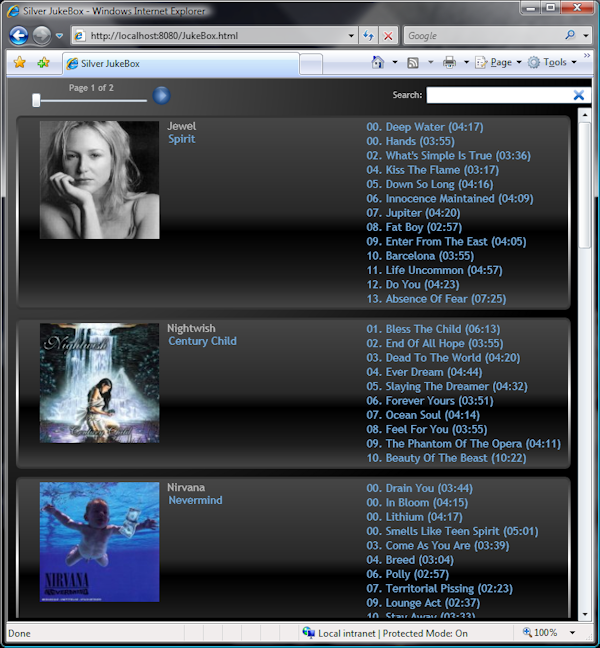
- A client developed in Silverlight 2, featuring browsing, searching and downloading music files
I feel a need to emphasize that this isn't another media player. The client isn't responsible for the actual 'playing' of the music; what it merely does is to allow 'access' to it. On my computer Windows Media Player (from now on WMP) is the default music player. When selecting a track or an album in the client, WMP pops up and starts playing, i.e. the client is assigned for accessing the music and WMP is responsible for playing it.
I would also like to point out a difference in behavior of Internet Explorer (from now on IE) and Firefox, since it affects the user experience of the application. When selecting a track or an album in IE, it's instantly passed over to WMP, letting it buffer and start playing even though the file hasn't been downloaded yet. Firefox however downloads the complete file before passing it on to WMP, which may take some time depending on internet connection.
Prerequisites
If you've got Visual Studio 2008 installed you're fine, otherwise you need to install the following components:
- .NET 3.5 Service Pack 1
- Microsoft SQL Server 2005
The Client
I do most of my user interface programming in WPF and was very eager to get my hands dirty with this new web supported framework called Silverlight. The differences between WPF and Silverlight is of course very well documented, but the first thing that struck me when starting to write Silverlight code was the idea of creating my own classes acting as DataContext for my UI controls, since in Silverlight it isn't possible to data bind to dependency properties using the ElementName methodology. At first, it gave me ghastly headaches whenever I had to create a new control, since I knew I had to create a DataContext class at the same time (and yes Visual Studio, I think you automatically should create a DataContext class whenever I am adding a new UI control to the project). Surprisingly along the development of the client I mended with the idea and actually started to like it. The fact that you are separating data and UI, not only by having them in XAML and code behind as you do in WPF, but in fact have them in entirely different classes is something I might embrace also for WPF; even though the need for it doesn't really exist unless you are using MVVM or similar patterns.
Background
In the following chapters I will discuss the design development, a brief history on why the application became as it is now.
Version 0.1
The very first version asked the server for all albums right up front when the client launched, the idea was to store all data on the client and then use the concept of paging albums, thus have a very fast paging since all data already existed on the client. The idea was also to feature instant searching, i.e. when you start typing text in the search field the search results practically updates on the fly, which would have been really cool.
But unfortunately the design was lousy for so many reasons I don't know where to start. First of all the loading time will depend solely on the size of the music library, and that's not a good design when you start think in the terms of scalability. It took my 4 year old computer about 4-5 minutes to completely load the data, and you should note that the server and client were running on the very same machine, this of course means that over a network it would have been even slower.
Version 1.0
If I wasn't able to have all data on the client, the instant search feature is impossible to implement since I wasn't at that point interested in implementing AJAX or similar techniques. Coming to terms with the fact that not all albums can exist on the client, I moved to the very far opposite end of the game field: what if the client was really stupid? What if all CPU and time consuming operations were to take place on the server? If you think about it, there's a very big chance that the server computer is more powerful than the client. What if the data displayed on the client was the only data available on the client? That would mean that not only paging would have to take place on the server, but also the searching. It was an intriguing idea that also sufficed the idea of scalability.
The consequence of this design is that data is requested from the server when:
- The client is launching
- A new page is displayed
- Enter is pressed in the search field
These bullets results in the method GetAlbums(...) in interface IJukeBoxServer described in chapter Web service interfaces.
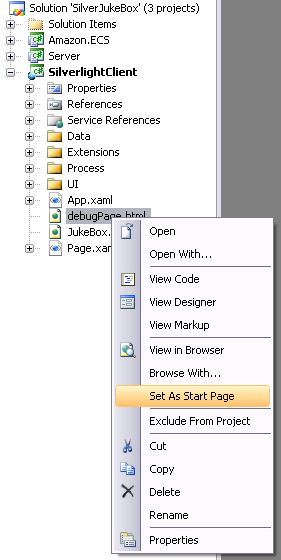
Debugging the Client
If you set debugPage.html as the start page, it will be possible to debug the client.
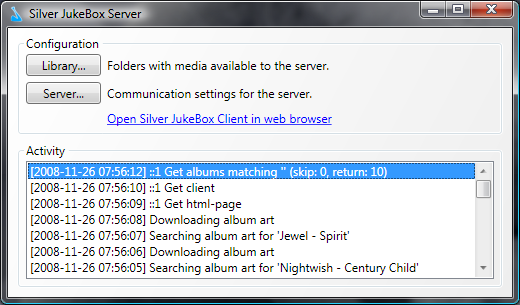
The Server
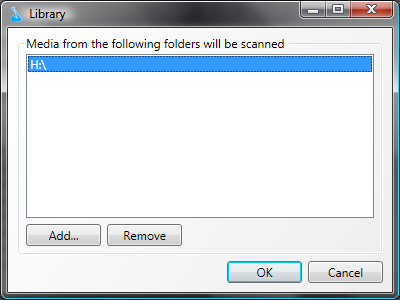
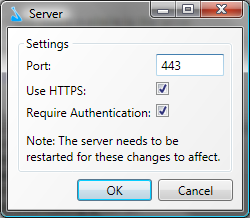
Let me first give you a quick tour of the server's user interface. The main window consists of two buttons. Library, if pressed, will open a dialog where you can configure the folders scanned for music, while Server lets you configure the server settings. There is also an activity log showing network requests made by the client, album art searches etc.
The library configuration is hardly worth mentioning, you simply add folders with music files to the list scanned by the server.
The server settings dialog on the contrary is more interesting. It exposes the following features:
- The possibility to specify a port to be used by the server
- Whether communication between server and client should be encrypted (further described in chapter Encrypted communication)
- Whether access to the client should require NTLM authentication (further described in chapter Authentication )
Web Service Interfaces
The server is exposing two interfaces: IFileServer and IJukeBoxServer. As the name states IFileServer is used when transporting files, e.g. the Silverlight client itself. IJukeBoxServer only contains one method responsible for transmitting albums between the server and the client. The method GetPolicy() solely exists since cross-domain calls should be allowed. More information about cross-domain can be found here.
[ServiceContract]
public interface IFileServer
{
 /// <summary>
 /// Gets the Silverlight policy file.
 /// </summary>
 [OperationContract, WebGet(UriTemplate = "/crossdomain.xml")]
 Stream GetPolicy();

 /// <summary>
 /// Gets the HTML page holding the Silverlight client.
 /// </summary>
 [OperationContract, WebGet(UriTemplate = "/JukeBox.html")]
 Stream GetHtmlPage();

 /// <summary>
 /// Gets the Silverlight client.
 /// </summary>
 [OperationContract, WebGet(UriTemplate = "/SilverlightClient.xap")]
 Stream GetClient();

 /// <summary>
 /// Gets a playlist of a specific album.
 /// </summary>
 [OperationContract, WebGet(UriTemplate =
    "/albumplaylist.wax?id={albumId}&base={basePath}")]
 Stream GetAlbumPlaylist(int albumId, string basePath);

 /// <summary>
 /// Gets a specific track.
 /// </summary>
 [OperationContract, WebGet(UriTemplate = "/song?id={trackId}")]
 Stream GetTrack(int trackId);
}
The single method in IJukeBoxServer allows the client to fulfill its requirement to display albums to the user. The first argument searchText is specifying whether the user is searching for a specific artist, album or track. The second argument skipCount allows the client to page albums by skipping search result matches, and the third argument resultCount is a constant value set in the client describing the number of albums to return, i.e. the number of albums existing on each page in the client.
[ServiceContract]
public interface IJukeBoxServer
{
 /// <summary>
 /// Gets albums matching a specified search text. The caller has also the
 /// option to specify the number of albums to skip and take.
 /// </summary>
 [OperationContract]
 SearchResultDto GetAlbums(string searchText, int skipCount, int resultCount);
}
Data Structure
The server is storing media related data in a Northwind database and accesses it using LINQ to SQL. LINQ has become my favorite among the features of the .NET Framework; it's so clean and elegant to write! The reason for using a Northwind database instead of a SQL Server Compact database, which you can add to a project as easily as you add anything else in Visual Studio, is because of LINQ to SQL. The current version of the Compact edition doesn't support LINQ to SQL, and since I am a huge fan of LINQ, the Compact edition wasn't really any option. I also suspect that Northwind is faster than Compact, but please don't flame me about this because it is my own personal opinion and isn't backed up by any scientific data at all. You are however free to prove me wrong whenever you want. Wait a minute, was that a thrown gauntlet? I guess it was...
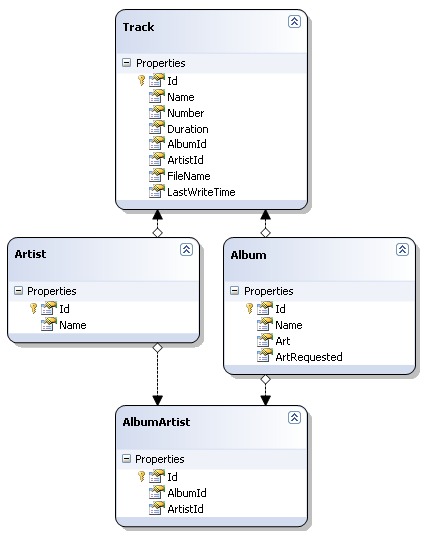
The database contains four tables:
- The Track table is a representation of the media files found on disk. One entry in this table represents one file on disk.
- A track does not contain an artist; it is instead referencing one in the Artist table using a foreign key relationship called
ArtistId. By having this relationship we are instructing the database to manage the tracks depending on performer. - We are separating albums in the same way we are separating artists, by having a foreign key relationship called
AlbumIdpointing from a track to an entry in the Album table. This way the database is managing what tracks a certain album contains. - The AlbumArtist table connects artists to albums by defining the two foreign key relationships
AlbumIdandArtistId. A query to get the artists on a specific album is because of these relationships very fast.
Using Amazon Associates Web Service for Getting Album Art
The display feature of album art in the client was crucial. Quite a lot of effort was put into the investigation of a reliable and high-percentage search hit service. Most tips on the internet pointed at a solution where the Yahoo image search engine was the best way to go, but I felt that there had to be better solutions. Finally I decided that Amazon Associates Web Service, formerly named Amazon E-Commerce Service or ECS, was the best solution simply because it provides a very mature API where I actually can state that I am searching for images. They also have a very, VERY good documentation of the API. I started implementing documented URL requests until I stumbled upon the Sample Code & Libraries section where you actually can download a .NET library that implements the URL requests for you. You simply describe what you're searching for by writing:
public static Uri SearchForAlbumArt(string artistName, string albumName)
{
 // Create the query
 AmazonECSQuery query = new AmazonECSQuery("MyAccessKeyId", null, AmazonECSLocale.US);

 // Create the request
 ItemSearchRequest request = new ItemSearchRequest
 {
   Artist = artistName,
   Title = albumName,
   SearchIndex = "Music",
   ResponseGroup = new List { "Images" }
 };

 try
 {
   // Perform search on Amazon
   ItemSearchResponse response = query.ItemSearch(request);

   // Validate the response
   if (
     response.Items.Count > 0 &&
     response.Items[0].Item.Count > 0 &&
     response.Items[0].Item[0].ImageSets.Count > 0 &&
     response.Items[0].Item[0].ImageSets[0].ImageSet.Count > 0)
   {
     return new Uri(response.Items[0].Item[0].ImageSets[0].ImageSet[0].MediumImage.URL);
   }
 }
 catch (AmazonECSException e)
 {
   // Do something about the exception
 }

 return null;
}
As you can see, the only negative part of using the Amazon web service is that you are required to sign up for a free Associates Web Service account to receive a Amazon Access Key Id, that you specify when creating the query. The server is storing the ID as an application setting, making it possible to set it in the downloadable binaries.
One other thing that's pretty cool is that you in your query can specify which locale to use, i.e. depending on where you live in the world you can optimize your requests by choosing a locale near you. I live in Sweden and can then choose between UK, DE (Germany) and FR (France) instead of e.g. US to speed up my requests. The locale is also defined as an application setting, making it possible to set in the downloadable binaries.
Encrypted Communication
The communication between server and client is possible to encrypt by enabling HTTPS in the server configuration dialog. The BasicHttpBinding and WebHttpBinding are created in a way that support encrypted communication, but by doing so they rely on an installed certificate on the computer. Instructions of how to create and install a certificate is described in the next chapter.
private bool StartWebService()
{
 serviceHost = new ServiceHost(typeof(Session), ServiceUri);

 // Create and configure the bindings, RPC and web/file delivery
 BasicHttpBinding basicBinding = CreateBasicHttpBinding();
 WebHttpBinding webBinding = CreateWebHttpBinding();

 serviceHost.AddServiceEndpoint(typeof(IJukeBoxServer), basicBinding,
     "SilverJukeBoxServer");
 serviceHost.AddServiceEndpoint(typeof(IFileServer),
     webBinding, "").Behaviors.Add(new WebHttpBehavior());

 EnableMetadata(serviceHost);

 try
 {
   serviceHost.Open();

   // Web service successfully started
   return true;
 }
 catch (AddressAlreadyInUseException)
 {
   // Unable to start the web service
   return false;
 }
}

private BasicHttpBinding CreateBasicHttpBinding()
{
 BasicHttpBinding basicBinding;

 // If we use HTTPS we need to enabled transport security
 if (IsHttpsEnabled)
 {
   basicBinding = new BasicHttpBinding(BasicHttpSecurityMode.Transport);
 }
 else
 {
   // If we don't use HTTPS we need to enabled credential security if
   // authentication is required.
   basicBinding = new BasicHttpBinding(IsRequiringAuthentication ?
     BasicHttpSecurityMode.TransportCredentialOnly : BasicHttpSecurityMode.None);
 }

 // Use standard windows authentication if enabled (Ntlm works with FireFox 2.0,
 // Windows doesn't)
 basicBinding.Security.Transport.ClientCredentialType = IsRequiringAuthentication ?
   HttpClientCredentialType.Ntlm : HttpClientCredentialType.None;

 // This should be better configured to match realistic worst case values.
 basicBinding.ReceiveTimeout = TimeSpan.FromHours(2);
 basicBinding.ReaderQuotas.MaxArrayLength = int.MaxValue;
 basicBinding.ReaderQuotas.MaxBytesPerRead = int.MaxValue;
 basicBinding.ReaderQuotas.MaxDepth = int.MaxValue;
 basicBinding.ReaderQuotas.MaxNameTableCharCount = int.MaxValue;
 basicBinding.ReaderQuotas.MaxStringContentLength = int.MaxValue;

 return basicBinding;
}

private WebHttpBinding CreateWebHttpBinding()
{
 WebHttpBinding webBinding;

 // If we use HTTPS we need to enabled transport security
 if (IsHttpsEnabled)
 {
   webBinding = new WebHttpBinding(WebHttpSecurityMode.Transport);
 }
 else
 {
   // If we don't use HTTPS we need to enabled credential security if authentication
   // is required.
   webBinding = new WebHttpBinding(IsRequiringAuthentication ?
     WebHttpSecurityMode.TransportCredentialOnly : WebHttpSecurityMode.None);
 }

 // Use standard windows authentication if enabled
 // (Ntlm works with FireFox 2.0, Windows doesn't)
 webBinding.Security.Transport.ClientCredentialType = IsRequiringAuthentication ?
   HttpClientCredentialType.Ntlm : HttpClientCredentialType.None;

 return webBinding;
}
Creating and Installing a Certificate
Creating and installing certificates can be a real headache but I've created a couple of files helping you on the way. These files are located in the Thirdparty folder of the downloadable source, i.e. NOT part of the binaries.
- Generate_certificate.bat contains instructions of how to create and install a certificate (Win32 OpenSSL Light is a prerequisite)
- httpcfg_add.bat is referred in Generate_certificate.bat, and contains instructions of how to map a certain certificate to a port on the computer
- httpcfg_remove.bat is the opposite to httpcfg_add.bat, i.e. it will remove a certificate mapping from a certain computer port
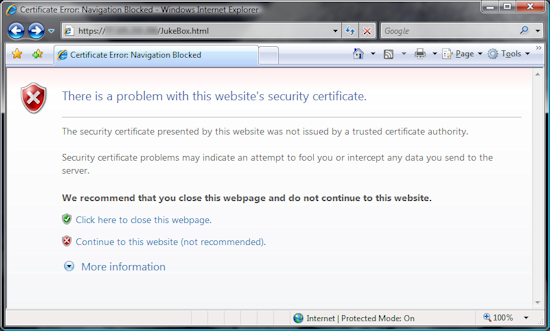
The following instructions in Generate_certificate.bat will install a certificate for you, but since you created and signed the certificate yourself it won't be considered as valid according to IE, Firefox or whatever browser you are using. A certificate is only valid if all of the following statements are true:
- Certificate hasn't expired
- Certificate's common name is matching URL
- Certificate is issued by a certified authority, e.g. VeriSign
The certificate created by Generate_certificate.bat will fulfill the first two statements assuming the correct common name was entered, but nevertheless the third statement will fail. This will manifest itself as a big red warning in your browser, which you of course can ignore and nevertheless browse to the client's user interface.
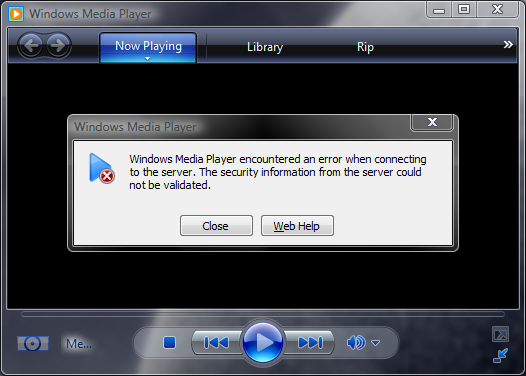
Unfortunately you won't get that option in WMP, which instead will show you a cryptic message and prevents you from playing music acquired from the client.
What you will have to do is to import the certificate into Windows 'Trusted Root Certification Authorities' store. The easiest way to do so is by browsing to the client using IE, ignore the certificate warning, and when view the certificate properties by clicking the red shield icon next to the address field.

There is a button within the certificate properties dialog that allows you to install the certificate, assuming you are running as an administrator. Make sure you place the certificate in the Trusted Root Certification Authorities, and then restart IE.
Authentication
Access to the client can be restricted using NTLM authentication, i.e. the same user management Windows is using. I myself created a new standard user called 'JukeBox,' and am using it when accessing the client. There are, however, a couple of issues you might run into before getting it to work. First of all, the user account you are using to access the client has to have a password, users without password will instantly be denied access. Furthermore, you have to disable ForceGuest if you are running a computer with Windows XP that isn't joined to a domain. And what is ForceGuest you might wonder, well Microsoft says it best:
"If Simple File Sharing is enabled on a Microsoft Windows XP system that is not joined to a domain, then all users who access this system through the network are forced to use the Guest account. This is the "Network access: Sharing and security model for local accounts" security policy setting, and is also known as ForceGuest."
This means that even though you created a new user to access the client with, the guest account is used nevertheless, which of course will fail. Follow these steps to disable the Simple File Sharing feature:
- Double-click the My Computer icon on the desktop, or click Start - My Computer
- Select Tools - Folder Options
- Select the View tab
- Clear the Use simple file sharing (Recommended) check box
You might have considerations for creating new users on your computer, for instance you might dislike that the new user is shown in the Windows login screen, but the following chapters will fix those issues for you.
Fix: Remove User Account from the Login Screen
A user account for the Silver JukeBox shouldn't be visible on the Windows login screen. Furthermore, if you by mistake log into Windows with that user a bunch of new files and folders will be created on your computer, something that's really annoying since the purpose of the user never was to actually log into Windows. A guide of how to removing a user from the login screen can be found here.
Fix: Enable Automatically Login
If you only have one user on your computer, and that user doesn't have a password, it means that Windows automatically will logon that user when you start the computer, and you have probably never seen the Windows login screen. As soon as you create a new user, you won't automatically be logged in anymore. If you feel that the login screen is the most annoying thing in the world, feel free to follow Windows XP or Windows Vista guide on how to automatically login to Windows.
Mail-Delivered Exception Logging
As it happens to be, I'm not anywhere near a perfect software engineer, thus I would like to know when the application crashes. The server is configured to send application exceptions using the SmtpAppender supported by log4net when a crash occurs, 'if' the user wishes so. The mail includes the last 1024 log rows along with information about the hosting computer. A typical mail looks like this:
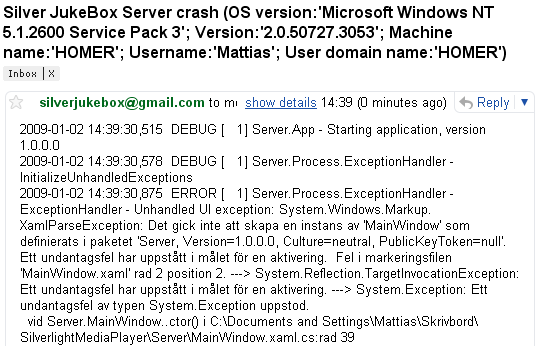
I know this is a sensitive issue, but my only intension is to improve the quality of the application, nothing more. If you don't wish to participate in improving the quality, feel free to deny when asked by the application.
->Read More...
Subscribe to:
Nhận xét (Atom)


